Wednesday, December 31, 2008

Happy New Year Everyone!

2008 is coming to an end and I must admit it's been a good year in all aspects of my life. On the photography and graphic design side of things it's been a great learning year! I got to meet a lot of interesting people and I learned a lot from some of them. My photographs have changed, from lots of landscapes and urban scenes to flash photography with Model Mayhem models. I did a lot of graphic design work for a natural supplements company, and all of it ended being published as advertising pieces in several trade publications. One of my photos got purchased for a tourism publication, which is due out in Jan. 09. Looking back, it was a great year!

So here's my list of professional freelancing goals for 2009 so I can go back to them throughout the year and see where I am standing at that particular point in time:

1. Heavily promote my wedding photography offering.
2. Get at least three (3) bookings (weddings) for the early fall season.
3. Get published again.
4. Generate at least $10,000 in freelance income.
5. Complete at least one (1) full scale personal project.

Ok, I think that's it for now. Last but not least, this is my last picture of 2008 with the accompanying setup shot below. The white balance used was a custom WB obtained with a reading from my ExpoDisc.
Geling

The Blue Experiment

Sunday, December 28, 2008

Available Natural Light

This shot was taken using available light from a window coming through a curtain made out of some cloth material, which acted as the perfect light diffuser. My cousin's face looks pretty soft when viewed at 100% because at the time I was using a Sigma 30mm f1.4. Little did I know that this lens, as with anything Sigma, had quality issues and when used in AF mode pretty much focused on anything BUT your focus point.

The picture was further post processed in PS CS4 using Nik Color Efex Pro 3.0's Draken/Lighten and Glamour Glow filters.
Andrea

Friday, December 26, 2008

Available Light Using Strobist Principles

While the Strobist mantra is all about using off-camera flash, what happens when all you are allowed to use is available light? I found myself shooting my church's Christmas Pageant last weekend and while I could use off-camera flash, setting it up was a whole different problem, as the children were moving all the time and coming in and out of the "stage" from different directions. The biggest problem was the lighting in the church, big lamps place in line beaming down at a 90 degree angle. In other words, a lot of kids were going to show up with "raccoon eyes" in the pictures. So here's the step by step problem solving scenario for this type of situation:

Problem 1: What white balance do I use? Too warm and you'll end up with a lot of color correcting in Photoshop, dial it down too much and you'll end up with the same problem. Save yourself some grief and PP time and get an ExpoDisc (Neutral).

Problem 2: Raccoon eyes on the kids from the light source pointing straight down over them. I found the best case scenario was when the kids were looking ahead with their heads tilted up at 15-20 degree angle (as if they were looking for their parents in the crowd). The perfect case scenario was when they were holding sheets of paper to sing their parts. The paper acted as a weak but "better than nothing" reflective source.

Here's the post processed version of the singing angel. Post processing to provide a more "angelical" look was done in PS3 using Nik's Color Efex Pro 3.0:
WCRC-51

This is the lighting setup for it, I guess you could duplicate it with a diffused or bare strobe placed right above and slightly in front of the forehead to provide a better bounce on the sheet of paper:
Lighting Setup for Angel

Tuesday, December 23, 2008

More Lumiquest Softbox III Testing

Given the harsh winter (and it just officially started this Sunday) I really haven't or rather dared to test this unit outdoors, so I took it along to my camera club's holiday party, which took place at a local pub. I slapped it on my SB-800 set to slave and added another SB-800 to my camera on commander mode. I added the diffuser that comes with the SB-800 to the strobe that had the Lumiquest Softbox III on it to diffuse the light even more. The settings on the camera were as follows: F4, at 1/15 shutter speed and ISO 1000, flash set to rear sync, which is probably the key to the whole setup (thanks for the tip Taylor)

As you can imagine, being indoors and in a dark setting to top it off, the trick resides in positioning the softbox just at the right distance away from the subject, otherwise you walk a thin line between "hot zones" around the face or an underexposed subject. For this particular photo, the power on the SB-800 was set at 1/128 and I still had to handhold the strobe above and behind my head to get a decent exposure on the faces with the minimal amount of blown highlights on the cheeks and forehead. Even then, I had to go into Photoshop and fix/eliminate a few.

TPMGDEC08-23

Skin smoothing and Glamour Glow were added via Nik's Color Efex Pro 3.0

This next photo was taken using the same technique, but using a different post-processing technique in Lightroom:
TPMGDEC08-10

Overall, I'm very pleased with the results obtained with the Lumiquest unit so far. I won't be putting the translucent umbrellas up for sale on Craigslist any time soon but it's good to know that whenever I feel lazy enough not to carry around my tripod bag (which I use to carry my umbrellas and light stands)there's a very portable alternative available.

Tuesday, December 16, 2008

Lumiquest Softbox III

I had heard many good reviews about this portable unit for close range portraits and such. David H. had nothing but good things to say about it so I decided to break down and buy it since it's very affordable. I had the opportunity to test it out today with a new co-worker for whom we needed to do a company announcement accompanied by a photo. I dropped the ambient exp. by about 1 stop and let TTL metering figure out the rest. I will try to post side by side comparisons with a shoot-through umbrella but right now it looks like it delivers as promised.

Murray

Wednesday, December 10, 2008

Lightroom Post processing

Some people at Flickr asked me how the post processing of this image was done:

Nyki Palmer @ Lake Shore

As I mentioned in the Description section, it was all done within Lightroom and used Matt Kloskowski's Sin City preset as a starting point. Okay, so I'll shut up for now and present you with the different settings used in Lightroom to achieve the look shown above.

Step 1.
Lightroom Settings 1

Step 2.
Lightroom Settings 2

Step 3.
Lightroom Settings 3

Step 4.
Lightroom Settings 4

Step 5.
Lightroom Settings 5

Step 6.
Lightroom Settings 6


Starting Image:
Nyki No Post Processing

Monday, November 10, 2008

The Big Chill is Coming

Even though the winter doesn't officially start until Dec. 21st, it sure felt like we were deep in it his past weekend. Jacqueline, came out all the way from Vancouver for a photography-filled week with various local photogs. Neil and I were one of those lucky ones who managed to capture her vibrant personality on digital. The weather was better than initially forecasted, as it didn't rain on us until after we were done but it was cold nonetheless.

We set up equipment just outside the Distillery District (Toronto, Canada) in front of an abandoned restaurant called Canary. Cops stopped by to check out what we were doing but they were okay with us taking pics, they did stick around for about twenty mins. to make sure we were in fact taking pics, as opposed to something illegal.

The setup for all the shots in the set was simple, two lights most of the time positioned at 45 degree angles in front of the model. One of the lights (B1600) was fitted to a 22" Beauty Dish and used as a main light while the second (B800) had a Paul C. Buff medium foldable Octabox attached to it and used for fill.

The final look of the images was achieved through Adobe Lightroom with further tweaks in Photoshop CS3. Here's a before and after:

BEFORE
Jacqueline at  Distillery District - RAW

AFTER
Jacqueline at the Distillery District

Thursday, October 30, 2008

The Learning Curve

Sometimes you think you have the shot, you look at the LCD screen quickly to check but you really don't pay too much attention because you get caught up in getting more poses and more shots. Well, this is a perfect example of a shot that had the right lighting but a hard shadow ruined the whole thing. The hard shadow thrown across her neck came from the pose and I didn't notice it until I opened the file in Lightroom (aren't you happy when that happens?). Anyways, at least it gives the model an nice decapitated look :-) Have a happy Halloween everyone!

Lora at High Park 4

Friday, October 24, 2008

Think Post Processing First

If you read through internet forums as well as trade mags such as DPP (Digital Photo Pro), pros relying heavily on post processing for their trademark look seem to agree on one thing, you have to see the end result in your head first before you can even touch the camera. Having a pretty good idea of your concept and how you want to execute it will help you a great deal in setting up lighting and directing your subject. Going into a photoshoot with no particular aim or idea has proven quite fruitless for me and more often than not I end up scrambling for different post processing techniques trying to bring a dull image to life by the miracle of Photoshop.

This is one such example, I went through 50+ shots after this photo shoot and this was the only image that caught my attention. From there, I realized the lighting was ideal for a certain PP technique and that was it. Needless to say the models never made final selects out of the proofs, which tells me that they weren't very happy with what I shot. Live and learn.
Sietzka and Jussi

Wednesday, October 22, 2008

On Location - High Park. Toronto, Canada

On Saturday, fellow photographer and Strobist, Neil (http://www.flickr.com/people/neilvv/) had arranged a photo shoot with Lora (http://www.modelmayhem.com/LoraIngram) from Model Mayhem. Finding a suitable location was a bit of a challenge as there were plenty of people everywhere due to the nice, sunny weather. We ended up at High Park, hoping to get some fall colors. The setup was pretty simple, an AB1600 on a 22" beauty dish as main light powered by a Vagabond II portable battery and a Speedotron head powered by a Speedotron battery pack as fill. The AB1600 was placed at camera right and in front of the model, while the Speedotron was placed to camera left slightly behind the model.

1. This shot was one of the first test shots we did, without the fill light.
Lighting Test with Neil

2. This one incorporated the Speedotron as fill light.
_DSC4249

Bundle up, it's getting colder up here.

Wednesday, October 15, 2008

Alien Bees and Speedlights Comparison

Yesterday (Tuesday, October 14th 2008) fellow strobist Shelley and I embarked on a little test of lighting and props on the lake shore of Toronto. We started out using an AB1600 on a medium octabox and tried to balance the ambient light but the problem was that the light was fading rapidly and the AB became to powerful (even at its lowest setting) so the highlights were constantly being blown out. The obvious option was to stand further away from the light, but as you can see in this example Shelley was not standing in the best of terrains and it just got plain dangerous as you tried to step further away from the octabox:

Dr. Doom is coming for your - Part 2
In this sample, the WB was set to Flash and the ISO was at 2000 in order to capture the ambient light without a tripod. The picture control was set to landscape (I had left it that way from a previous outing the day before)


As you can see, in the sample above, we were not quite capturing that dark gloomy mood we were looking for, so we decided to switch over to SB-800s triggered via Nikon CLS. To get the bluish color on the ambient, we dropped the WB to around 2600K (temp) and put on a daylight balance gel on the off-camera SB-800. The power output on the off-camera flash was 1/64th. Note: bring a flash light with you to find a focus point, otherwise use a cellphone as shown in this pic.
Dr. Doom looking to hook up this Halloween
Looking back on the shot, we should've set up a second flash to light the upper body but I still like the way this one came out.

Friday, October 10, 2008

TGIF - Strobing Thursday

I was a little sick of spending the evenings at home watching TV so I decided to go out last night for a street shooting session, which later evolved into a Strobist session. I called fellow strobist Shelley (http://www.flickr.com/photos/shelleyannmc/)to see if she wanted to join me in my excursion. The night was kind of a bust because it was windy and the umbrellas kept getting knocked over, to the point we gave up on them and tried to go with bare flashes. However, the bigger problem was the lack of planning on my part so we were just aimlessly scouting locations and trying to shoot at the same time. Lesson learned for the day: SCOUT YOUR LOCATION FIRST!

Testing Nikon's CLS  Part 2 - Taken by Shelley
This shot was taken by Shelley and it was probably one of the best ones of the night. The technical setup is as follows: ISO pumped up to 2000 and WB set to 3700K while using a CTO gel on the SB-800 positioned at camera left and set to 1/128 power with the diffuser cap on. We tried using umbrellas but the wind kept knocking them down.

I was so frustrated with the lack of results for the night that I proceeded to walk back to Dundas Square (Toronto, Canada) and shoot a crew of break dancers that I had seen earlier. No strobes this time, I just relied on the amazing high ISO capabilities of the Nikon D3. All shots were taken at ISO 3200

V for Vreak Dancing 2009 - Part 16

Have a happy thanksgiving! (Canada)

Wednesday, October 8, 2008

No Pictures for you today!

Tomorrow

Well, I had my mind set on a photowalk around the downtown core today and figured the rain wouldn't be that bad. Boy, was I wrong! By 5pm it was very clear that I was going to have to cancel my plans and wait until tomorrow. I took this shot before leaving the parking lot of my office. About an hour and half later I made it home. Tomorrow will be another day and hopefully better pictures will accompany my post.

Monday, October 6, 2008

Nuit Blanche 2008

I had never been to this event before so I thought it would be a great opportunity to take a lot of pictures. I even envisioned running short on memory cards but by the end of the night (or morning) I had only taken less than a hundred shots. I think it's time to get back to Strobism and leave street shooting to those that are actually good at at it. I'm looking forward to October 18th, when I'll get together with fellow strobist Neil () for a photo shoot with a model. I think it's time to start pushing the envelope of creativity and lighting possibilities and I hope it will show in my next post. Having said that, here are a few shots from Saturday night at Scotiabank's Nuit Blanche 2008:

1. Stairs to Heaven
_DSC3909

2. Anatomy of Kink
_DSC3907

3. The Classic C
_DSC3903

4. City Hall
_DSC3756

5. Ice Cream Blues
_DSC3786

6. Dancer on a streetcar window
Dancer on Streetcar window

Monday, May 19, 2008

Lighting on Location

Have you ever visited the Stobist page on Flickr and wondered in amazement how those really cool shots were engineered? Well, here's a quick post on the setup and the resulting image:

1. The Setup
The Setup

2. The Result
Travis Knights3

This setup (check out the notes on the Flickr image) is not for the starving student but it sure beats the more expensive stuff (Profoto, etc.) in price. Have a great week!

Tuesday, March 11, 2008

The Creative Process

If you ever found yourself stuck in a creative rot then Flickr is the place to reconnect with your creative self. For a site that started as a medium for uploading family pics, etc., the evolution has been rather dramatic. Nowadays, if you spend the time to look for talent and inspiration you will find it and you will definitely be surprised by the quality of it, so before this post gets too long here are some examples of the people whose Photostreams are just jaw dropping amazing:

PROVERBS 31:10
http://www.flickr.com/photos/proverbs31/

Chris Kovacs
http://www.flickr.com/photos/chriskovacs/

Zuan
http://www.flickr.com/photos/zuan/

Peter Bowers
http://www.flickr.com/photos/mr_fabulous/

Rodolphe Simeone
http://www.flickr.com/photos/all_the_names_are_already_taken_pfff/

Tiny Dancer
http://www.flickr.com/photos/disneyprincess/

Simon Pais-Thomas
http://www.flickr.com/photos/simonpais/

These are just a few of the many talented photographers you can find on Flickr. Visit their photostreams when you feel low on inspiration.

Monday, February 4, 2008

Photoshop Retouching for Fashion Shoots

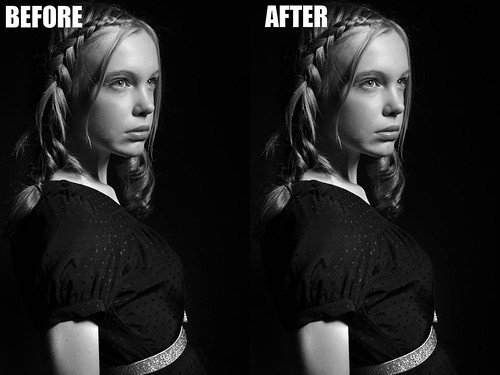
Well, most pros actually leave this part of the job to a photo retoucher but if you are on a budget, actually have the time to do it and have some basic knowledge of Photoshop here are a few steps that you can follow to achieve that "magazine look":

1. Do not go crazy with the retouching, subtle changes work best:
Photo Retouching with PS CS3

2. Start by zooming in on the problem areas:
Removing Spots and Blemishes Zoomed In

3. Copy the background layer by hitting Ctr/Cmd+J then create a new layer and select the Spot Healing Tool (J):
Removing Spots and Blemishes Spot Healing

4. Make sure that the box "Sample All Layers" is selected in the File menu:
Removing Spots and Blemishes File Menu

5. Select the problem spots and make sure that the circle (cursor) is bigger than the problem area. You can increase or decrease the size of the circle by hitting the left or right bracket key. Click on the problem area and drag the cursor until you see a black spot form over the spot and then let go.

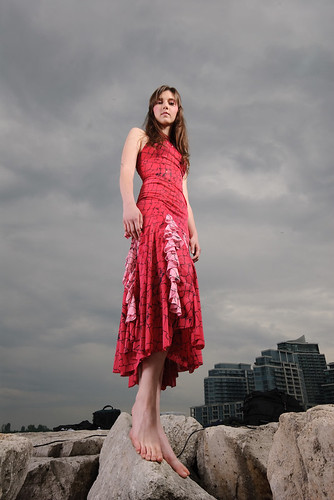
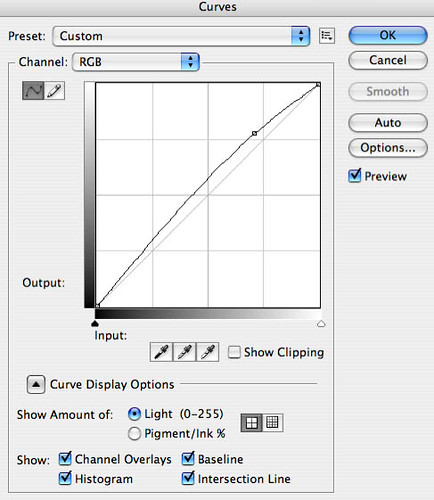
6. In this particular example, the image could use a bit more highlights. Select Curves from the Adjustment Layers (circle half black and half white) menu at the bottom of the layers palette and adjust the entire RGB curve as follows:
Removing Spots and Blemishes Curves

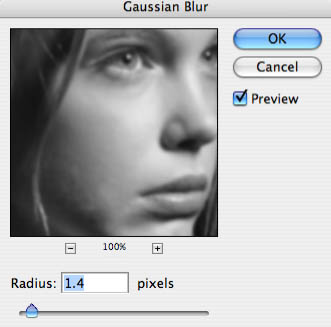
7. We did remove spots and blemishes from the model's skin but further smoothing might be needed and this can be accomplished by using a localized blur. Create a new blank layer and then while clicking on the Ctrl/Cmd key select Merge Visible from the Layers drop down menu. This will bring up a new image copy with all the properties of the layers below. Select Filter>Blur>Gaussian Blur from the Filters menu:
Removing Spots and Blemishes Gaussian Blur

This process will add a global blur to the whole image but you want to apply it locally so add a Mask Layer (third item from the left at the bottom of the layers palette)and invert it (Ctr/Cmd+I). Now select the Brush Tool (set foreground color to White) and adjust the settings of the Brush Tool as follows:
Removing Spots and Blemishes Blur Brush Properties

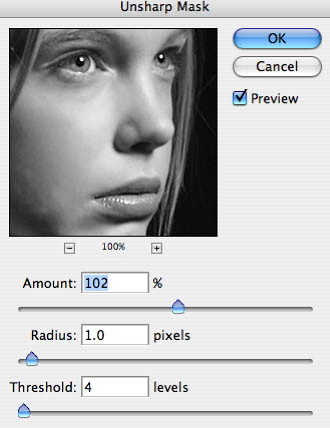
8. The final step (for this image) includes a slight sharpening of the eyes and lips. Once again, create a new layer and then while pressing the Ctrl/Cmd key, select Merge Visible from the Layers palette drop down menu. Select the Pen Tool (P) and start carefully selecting the eyes and the lips. If you have no experience with the Pen tool then use the Polygonal lasso tool, which is not as accurate when drawing curved shapes:
Sharpening  Eye Selection

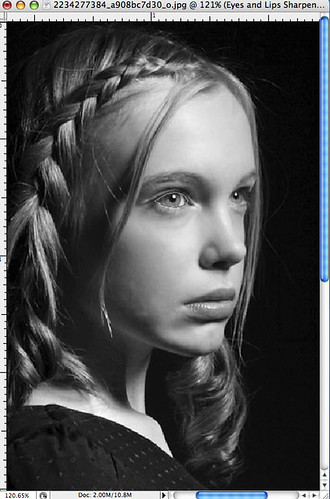
9. Once the selections have been made go to the Paths tab in the layers palette and select the Work Path layer. Once selected, click on "Load Path As Selection" (third item from the left at the bottom of the Layers palette. Then hit Shift+Ctrl/Cmd+I to invert the selection and go to Filters>Sharpen>Unsharp Mask. The amount of sharpening depends on the resolution of the image:
Sharpening  Unsharp Mask

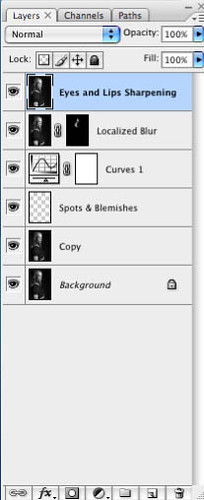
10. Your final layer structure should look something like the following. Don't forget to rename your layers so you know where to go to back to in case changes need to be made:
Sharpening  New Layer