Wednesday, December 31, 2008

Happy New Year Everyone!

2008 is coming to an end and I must admit it's been a good year in all aspects of my life. On the photography and graphic design side of things it's been a great learning year! I got to meet a lot of interesting people and I learned a lot from some of them. My photographs have changed, from lots of landscapes and urban scenes to flash photography with Model Mayhem models. I did a lot of graphic design work for a natural supplements company, and all of it ended being published as advertising pieces in several trade publications. One of my photos got purchased for a tourism publication, which is due out in Jan. 09. Looking back, it was a great year!

So here's my list of professional freelancing goals for 2009 so I can go back to them throughout the year and see where I am standing at that particular point in time:

1. Heavily promote my wedding photography offering.
2. Get at least three (3) bookings (weddings) for the early fall season.
3. Get published again.
4. Generate at least $10,000 in freelance income.
5. Complete at least one (1) full scale personal project.

Ok, I think that's it for now. Last but not least, this is my last picture of 2008 with the accompanying setup shot below. The white balance used was a custom WB obtained with a reading from my ExpoDisc.
Geling

The Blue Experiment

Sunday, December 28, 2008

Available Natural Light

This shot was taken using available light from a window coming through a curtain made out of some cloth material, which acted as the perfect light diffuser. My cousin's face looks pretty soft when viewed at 100% because at the time I was using a Sigma 30mm f1.4. Little did I know that this lens, as with anything Sigma, had quality issues and when used in AF mode pretty much focused on anything BUT your focus point.

The picture was further post processed in PS CS4 using Nik Color Efex Pro 3.0's Draken/Lighten and Glamour Glow filters.
Andrea

Friday, December 26, 2008

Available Light Using Strobist Principles

While the Strobist mantra is all about using off-camera flash, what happens when all you are allowed to use is available light? I found myself shooting my church's Christmas Pageant last weekend and while I could use off-camera flash, setting it up was a whole different problem, as the children were moving all the time and coming in and out of the "stage" from different directions. The biggest problem was the lighting in the church, big lamps place in line beaming down at a 90 degree angle. In other words, a lot of kids were going to show up with "raccoon eyes" in the pictures. So here's the step by step problem solving scenario for this type of situation:

Problem 1: What white balance do I use? Too warm and you'll end up with a lot of color correcting in Photoshop, dial it down too much and you'll end up with the same problem. Save yourself some grief and PP time and get an ExpoDisc (Neutral).

Problem 2: Raccoon eyes on the kids from the light source pointing straight down over them. I found the best case scenario was when the kids were looking ahead with their heads tilted up at 15-20 degree angle (as if they were looking for their parents in the crowd). The perfect case scenario was when they were holding sheets of paper to sing their parts. The paper acted as a weak but "better than nothing" reflective source.

Here's the post processed version of the singing angel. Post processing to provide a more "angelical" look was done in PS3 using Nik's Color Efex Pro 3.0:
WCRC-51

This is the lighting setup for it, I guess you could duplicate it with a diffused or bare strobe placed right above and slightly in front of the forehead to provide a better bounce on the sheet of paper:
Lighting Setup for Angel

Tuesday, December 23, 2008

More Lumiquest Softbox III Testing

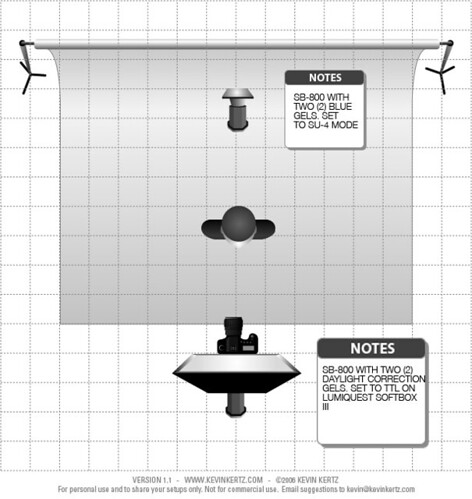
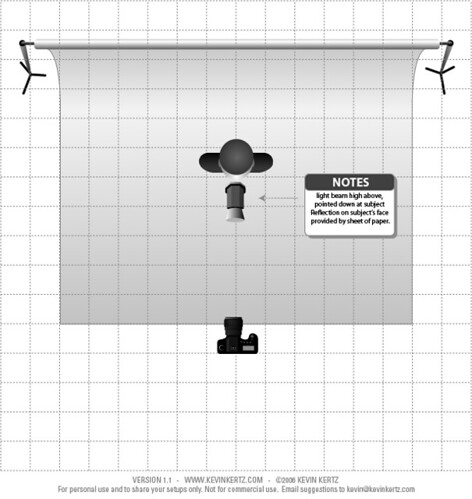
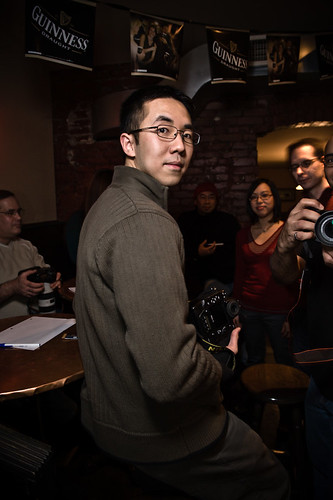
Given the harsh winter (and it just officially started this Sunday) I really haven't or rather dared to test this unit outdoors, so I took it along to my camera club's holiday party, which took place at a local pub. I slapped it on my SB-800 set to slave and added another SB-800 to my camera on commander mode. I added the diffuser that comes with the SB-800 to the strobe that had the Lumiquest Softbox III on it to diffuse the light even more. The settings on the camera were as follows: F4, at 1/15 shutter speed and ISO 1000, flash set to rear sync, which is probably the key to the whole setup (thanks for the tip Taylor)

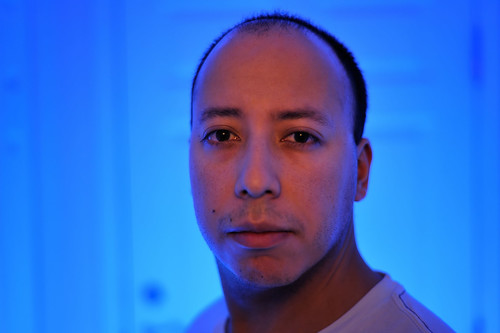
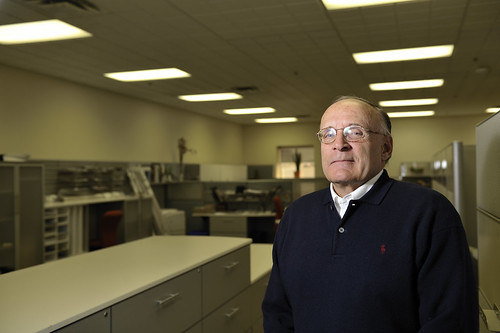
As you can imagine, being indoors and in a dark setting to top it off, the trick resides in positioning the softbox just at the right distance away from the subject, otherwise you walk a thin line between "hot zones" around the face or an underexposed subject. For this particular photo, the power on the SB-800 was set at 1/128 and I still had to handhold the strobe above and behind my head to get a decent exposure on the faces with the minimal amount of blown highlights on the cheeks and forehead. Even then, I had to go into Photoshop and fix/eliminate a few.

TPMGDEC08-23

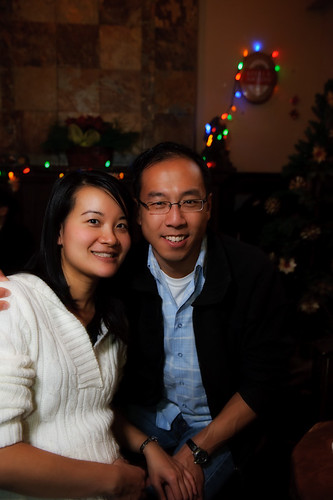
Skin smoothing and Glamour Glow were added via Nik's Color Efex Pro 3.0

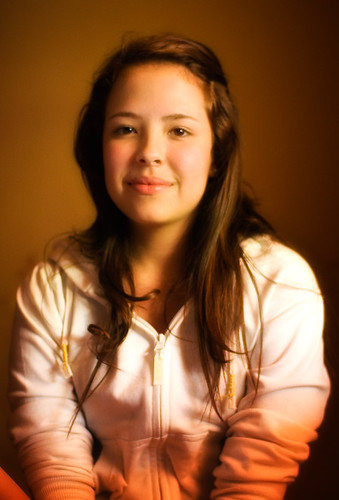
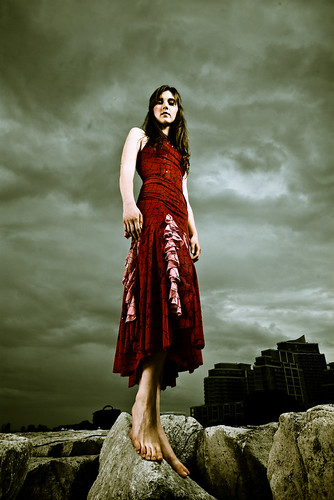
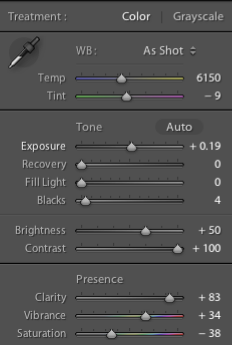
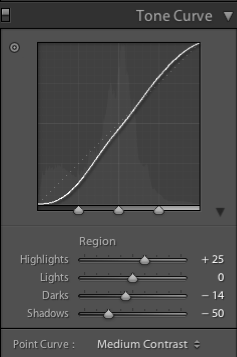
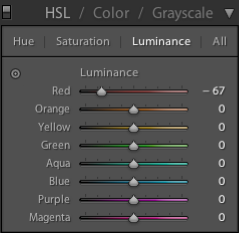
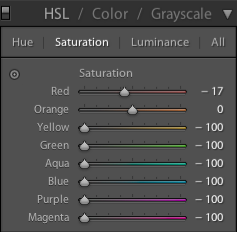
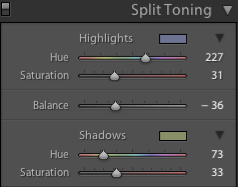
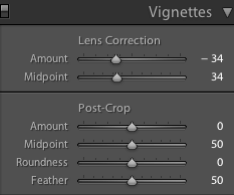
This next photo was taken using the same technique, but using a different post-processing technique in Lightroom:
TPMGDEC08-10

Overall, I'm very pleased with the results obtained with the Lumiquest unit so far. I won't be putting the translucent umbrellas up for sale on Craigslist any time soon but it's good to know that whenever I feel lazy enough not to carry around my tripod bag (which I use to carry my umbrellas and light stands)there's a very portable alternative available.

Tuesday, December 16, 2008

Lumiquest Softbox III

I had heard many good reviews about this portable unit for close range portraits and such. David H. had nothing but good things to say about it so I decided to break down and buy it since it's very affordable. I had the opportunity to test it out today with a new co-worker for whom we needed to do a company announcement accompanied by a photo. I dropped the ambient exp. by about 1 stop and let TTL metering figure out the rest. I will try to post side by side comparisons with a shoot-through umbrella but right now it looks like it delivers as promised.

Murray

Wednesday, December 10, 2008

Lightroom Post processing

Some people at Flickr asked me how the post processing of this image was done:

Nyki Palmer @ Lake Shore

As I mentioned in the Description section, it was all done within Lightroom and used Matt Kloskowski's Sin City preset as a starting point. Okay, so I'll shut up for now and present you with the different settings used in Lightroom to achieve the look shown above.

Step 1.
Lightroom Settings 1

Step 2.
Lightroom Settings 2

Step 3.
Lightroom Settings 3

Step 4.
Lightroom Settings 4

Step 5.
Lightroom Settings 5

Step 6.
Lightroom Settings 6


Starting Image:
Nyki No Post Processing